
Etisalat
e& (formerly Etisalat) is an Emirati state-owned telecom company, ranked 16th globally by subscribers. It’s a major internet hub and the largest international voice carrier in the Middle East and Africa.
Role
As a UX designer, it was essential for me to understand the business requirements and apply UX best practices to improve the experience for 173 million user across mobile, web, and SaaS platforms. My key achievements include leading the redesign of major features such as Home Move, Usage Summary, and Add-on purchases.
We need to follow the Markaz library—a design system that outlines all components and guidelines to ensure consistency and efficiency across the platform.
Goal
The goal of this case study is to show how I applied core UX principles to solve a common issue faced by user of e& while using the home feature of etisalat while moving form old location to new.
Duration
9 months (Overall project), 3 week (Home move ticket)
Problem statement
Problem statement
Revamp whole Home move feature.
Enhance the overall user experience of the Home Move feature used by 173 millions of customer, identifying user pain points and frustrations. Design a more intuitive and informative journey that clearly communicates each user action, ensuring the process is as simple and straightforward as possible.
Metrics
Shifting request
31%
Drop off
55%
Note - You can find the Impact Metrics (result) at the end of case study
What is Home Move?
What is Home Move?
Etisalat provides network connectivity to its customers. When a customer plans to move from their old location to a new one, they use the Home Move feature to ensure uninterrupted connectivity and continued access to the e& network. And e& don't lose the loyal customers. However, over time, some issues with this feature have caused customer frustration and drop-offs.
User research and Analysis
User research and Analysis


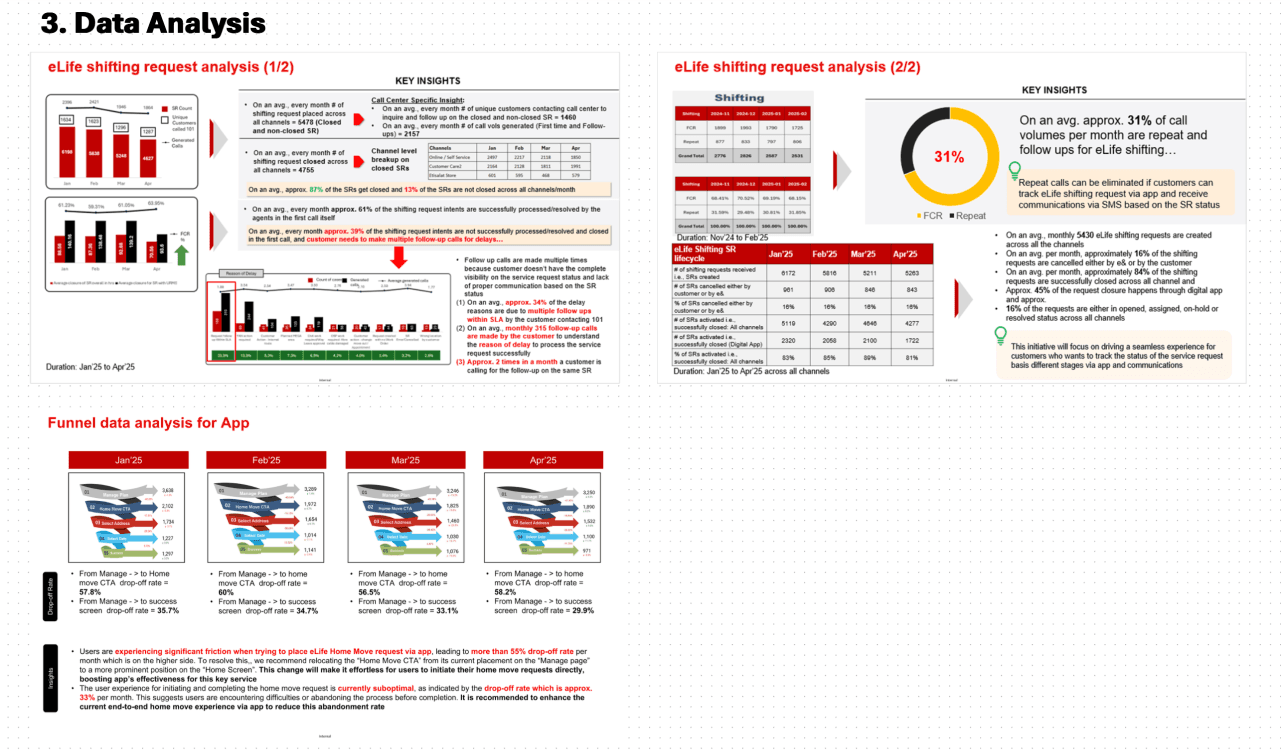


Understanding user pain points
Understanding user pain points
Lets draw the current journey.
Redefined Problem Statement
The Home Move journey is complex and confusing, causing user frustration due to unnecessary steps, unclear communication, and limited service options at new locations.
The Home Move journey is complex and confusing, causing user frustration due to unnecessary steps, unclear communication, and limited service options at new locations.
The overall Home Move journey is not intuitive or user-friendly, with many unnecessary steps. In most cases, the move-out date from the old location is the same as the move-in date at the new location. Customers often receive confusing or incorrect information about the technician's contact number. Additionally, if the new location is not yet covered by the e& network, customers are not offered alternative internet service options.
Pain points
The "Home Move" feature is buried too deep within profile management, making it nearly impossible for users to find and start the process.
Users have no visibility into the number of steps required, leading to frustration and "progress fatigue."
The map pin and text address fields are not synchronized, making it unintuitive and difficult to pinpoint a specific location.
In areas without a wired e& network, the app fails to provide alternative connectivity options (like 5G/Wireless), leading to "service dead end".
A lack of clear communication regarding the exact installation time at the new address creates unnecessary anxiety and scheduling conflicts.
The journey treats "Move-Out" and "Move-In" as two separate, mandatory milestones, despite them being identical for 99% of customers.
Relying on only one contact number often results in missed appointments if the user is momentarily unavailable.
User has to pay extra amount for installation of redemption device and extendors after home move is done.
Unclear instructions on which devices to pack and which to leave behind frequently lead to missing hardware and installation delays.
The order summary page lacks a clear visual hierarchy, making it difficult for users to understand the pricing breakdown at a glance.
The absence of an order tracking link at the end of the journey leaves users in the dark regarding their request status.
What is to be done
Add the Home Move feature prominently on the landing screen.
Redesign the process for adding a new address to be more intuitive, including scenarios for areas without e& network coverage by providing alternative options like home wireless.
Remove the Move-Out Date as a mandatory step and integrate it as an optional field within the Move-In Date screen.
Introduce a Contact screen with an option to add an alternate contact number.
Include device redemption scenarios as optional steps.
Incorporate upselling opportunities for extenders as optional scenarios.
Add an Important-to-Know screen covering device redemption details.
Update the Order Summary screen for clarity and completeness.
Create a Confirmation screen that includes an order tracking link.
Add the Home Move feature prominently on the landing screen.
Redesign the process for adding a new address to be more intuitive, including scenarios for areas without e& network coverage by providing alternative options like home wireless.
Remove the Move-Out Date as a mandatory step and integrate it as an optional field within the Move-In Date screen.
Introduce a Contact screen with an option to add an alternate contact number.
Include device redemption scenarios as optional steps.
Incorporate upselling opportunities for extenders as optional scenarios.
Add an Important-to-Know screen covering device redemption details.
Update the Order Summary screen for clarity and completeness.
Create a Confirmation screen that includes an order tracking link.
These key UX tasks have been identified to improve the project’s overall user experience and significantly reduce drop-off rates. The current screens use outdated designs, so modern design styles should be incorporated to create a fresh and engaging experience. Special attention must be given to minimizing cognitive load across all screens to reduce user friction as much as possible.
Pain points
The "Home Move" feature is buried too deep within profile management, making it nearly impossible for users to find and start the process.
Users have no visibility into the number of steps required, leading to frustration and "progress fatigue."
The map pin and text address fields are not synchronized, making it unintuitive and difficult to pinpoint a specific location.
In areas without a wired e& network, the app fails to provide alternative connectivity options (like 5G/Wireless), leading to "service dead end".
A lack of clear communication regarding the exact installation time at the new address creates unnecessary anxiety and scheduling conflicts.
The journey treats "Move-Out" and "Move-In" as two separate, mandatory milestones, despite them being identical for 99% of customers.
Relying on only one contact number often results in missed appointments if the user is momentarily unavailable.
User has to pay extra amount for installation of redemption device and extendors after home move is done.
Unclear instructions on which devices to pack and which to leave behind frequently lead to missing hardware and installation delays.
The order summary page lacks a clear visual hierarchy, making it difficult for users to understand the pricing breakdown at a glance.
The absence of an order tracking link at the end of the journey leaves users in the dark regarding their request status.
Home move in landing screen
Home move in landing screen


As per the requirements, the Home Move feature is placed within the Manage Profile section and added to the Quick Access area, providing customers with multiple entry points into the journey. New customers can also find the Home Move feature prominently displayed upfront, eliminating the need to search for it elsewhere in the app.
Onboarding

Old screen
Old screen

New Screen
New Screen
The onboarding screen was also uplifted.
For UX -
Provide a warm and reassuring onboarding message: "Let us take care of your plan, so you can focus on settling into your new home!" to ease user anxiety and build trust.
Limit the Home Move journey to three mandatory steps, clearly communicating this to reduce user stress about the process length.
Transparently display all charges related to the Home Move upfront, helping users understand costs from the very beginning and avoid surprises.
For UI -
Maintain a clear and uncluttered user interface to enhance usability and focus.
Apply modern design principles to create a fresh, engaging, and elevated user experience.
Use background imagery that evokes positive emotions and reinforces the happiness associated with moving into a new home.
"The Home Move process is now streamlined into 3 main, easy-to-follow steps, enhancing user clarity and reducing complexity. "
Step 1 - Add new address
For adding new address we have 3 scenarios -
Same Emirates - When the user is moving within same emirates and has e& connection in the new location
Different Emirates - When the user is moving from one emirates to another emirates and has e& connection in the new location
No connection - When the user is moving to a location without e& connection.
Same Emirates


A visual progress bar clearly indicates the user’s advancement through the Home Move tasks, providing continuous feedback and reducing uncertainty.
Map allows users to add a new address by either manually entering the location or searching via suggestions, with an interactive map to pinpoint the exact address for accuracy.
Bottom sheet appears after confirming the location. This involves entering detailed address information where the building name and street area are pre-filled but editable, and the flat or villa number must be entered to specify the exact location.
The option to add the number of rooms in the new home is introduced to tailor the experience, enabling targeted upselling opportunities such as Wi-Fi extenders for larger spaces.
Different Emirates


When a user moves to a different emirate, they are required to change their phone number. The system will automatically generate a new number for them, but they still have the option to customize it if they wish. Since changing the number is part of the "Add New Address" task, it will be considered as part of the first step in the home move process.
No connection
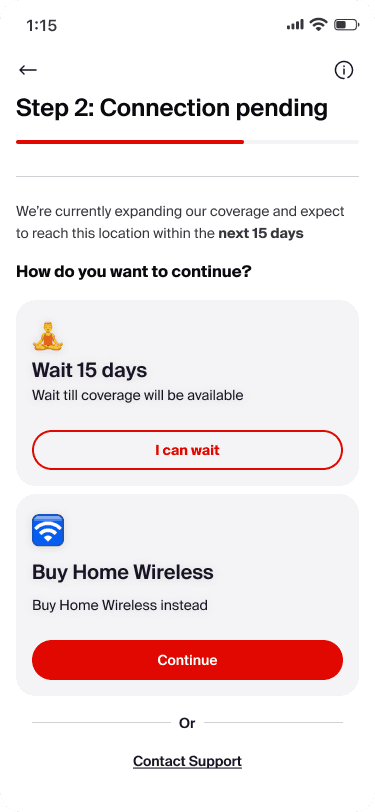
When a user moves to an area without e& network coverage, they are offered three key options: wait for the network to be established in that location within a specific timeframe; use the Home Wireless plan, which works without e& installation; or contact support to discuss the issue directly. This approach addresses major customer concerns like lack of alternative options and waiting without charges. A clear message such as "We're currently expanding our coverage and expect to reach this location within 15 days" informs users about the wait time upfront, reducing uncertainty and easing the decision-making process.
Step 2 - Move in date & time
For selecting move in date & time we have 4 scenarios
Technician slot available - When technician's slot is available for the visit.
Technician slot unavailable - When technician's slot is unavailable for the visit.
Move out date is before move in date - When the user wants to change the move-out date to a date before the move-in date.
Move out date is after move in date - When the user wants to change the move-out date to a date after the move-in date.
Technician slot available

In the ideal scenario, all technician slots are available. The system will automatically preselect the first available slot, since most users prefer choosing the earliest option. This way, in most cases, users only need to confirm the date rather than manually selecting one.
Technician slot unavailable

In some cases, the technician are not available to visit the new location. The system will preselect the first available slot. In most cases the user would want to select the first available slot. The system will also notify with the user with a note "Since there are no slots available on selected move-in date, we are giving you the next available slot."
Move out date is after move in date


By default, the system sets the move-in and move-out dates to be the same unless the user actively changes the move-out date. To do this, users can click on a clearly labeled option, ‘Is your move-out date different?’ and then select ‘Change.’ This interaction leverages the Gestalt principle of closure, helping users intuitively recognize and differentiate the feature. If a move-out date earlier than the move-in date is selected, the system will automatically update it once the change is confirmed.
Move out date is after move in date


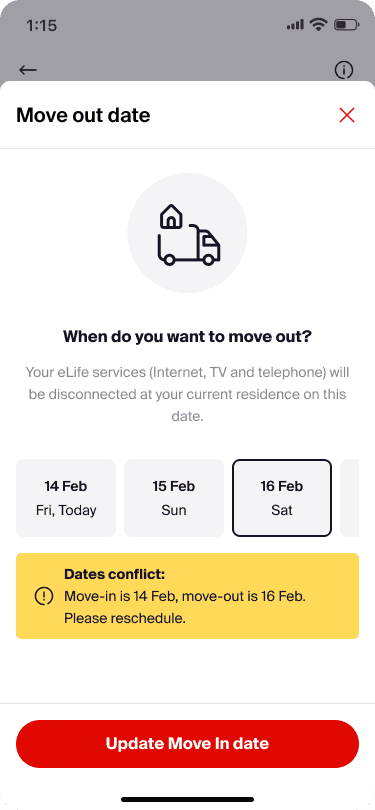
If the user selects a move-out date that is before the move-in date, the system will display an error message: "Date conflict: Move-in is 14 Feb, move-out is 16 Feb. Please reschedule." The call-to-action button will automatically update to "Update Move-in Date." The user must then update the move-in date to a date after the move-out date, after which they can confirm and proceed to the third step.
Step 3: Contact preference
For contact preference we have 2 scenarios
Use primary number - When the user prefers to be contacted on the primary they use for all the purpose.
User alternate number - When the user prefers to be contacted on the alternate number solely used for the home move purpose.
Use primary number

In the ideal scenario, most users tend to select their primary phone number as the preferred contact method. The system will prefill this number and clearly display the message, "The technician will call you on this number".
User alternate number
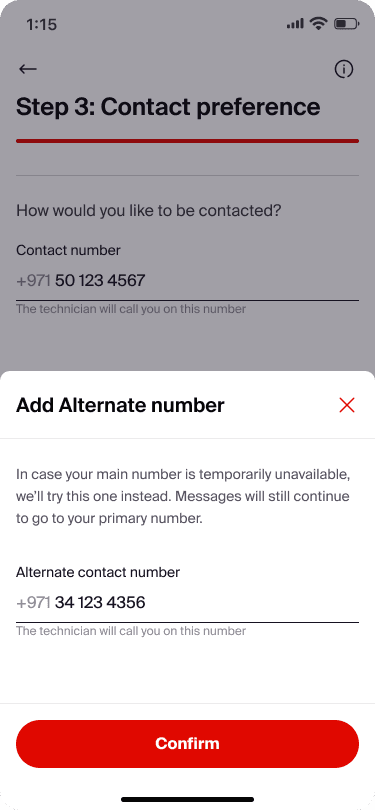

Following the same Gestalt principle, the option to add an alternate contact number is positioned consistently in the same area as the ‘Change move-out date’ option, maintaining design uniformity. If the user wishes to add an alternate number, they can click ‘Add,’ which opens a bottom sheet with a clear message: ‘In case your main number is temporarily unavailable, we’ll try this one instead. Messages will still continue to go to your primary number.’ This message prevents confusion about message routing to the alternate number. Once the user adds and confirms the alternate number, it will be updated on the contact preference screen, and the message ‘The technician will call you on this number’ will shift to the alternate number.
Here are the sub scenarios of device redemption and upselling extenders.
Device Redemption
Device redemption refers to scenarios where a customer has been using an e&-provided device that is either outdated or has exceeded two years of use. In such cases, the customer is offered a replacement device, which could be free or available under the Neo (paid) plan. The key challenge with device redemption is that customers were unclear about their eligibility and, even if they were eligible, they often did not know that separate delivery or installation charges might apply.
Device redemption refers to scenarios where a customer has been using an e&-provided device that is either outdated or has exceeded two years of use. In such cases, the customer is offered a replacement device, which could be free or available under the Neo (paid) plan. The key challenge with device redemption is that customers were unclear about their eligibility and, even if they were eligible, they often did not know that separate delivery or installation charges might apply.
Upselling extenders
When customers move from their old location to a new one, they may shift into a larger apartment with more rooms. In such cases, having additional devices becomes essential to ensure stronger internet coverage across the entire home. This creates an opportunity to upsell extenders devices that can be placed in different corners or rooms to expand and enhance the network range.
When customers move from their old location to a new one, they may shift into a larger apartment with more rooms. In such cases, having additional devices becomes essential to ensure stronger internet coverage across the entire home. This creates an opportunity to upsell extenders devices that can be placed in different corners or rooms to expand and enhance the network range.
Device Redemption

Paid
Paid

Eligible
Eligible
Additional devices
Additional devices
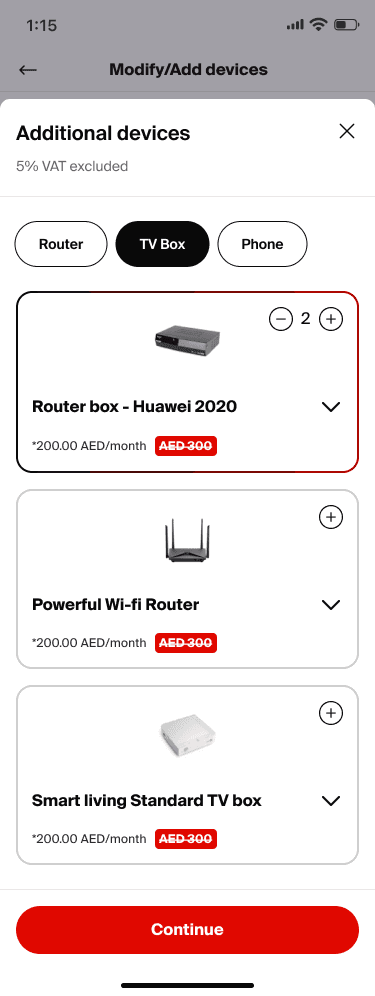
Device redemption mainly has 3 scenarios.
If the customer is not eligible for device redemption, this journey will not be visible to them.
If the customer is eligible for a free device redemption, they will see the "Get a New Device" screen with the available free device options. They can also choose to add additional devices for a fee.
Alongside, Neo plan devices will be displayed as paid options.
Whatever devices user adds is reflected in the order summary page.
Upselling extenders
There are 3 extender e& provides to the customer. i.e. Home Zone, Full Home Wifi and Fiber to the Room (FTTR)
Home Zone - less than 2 rooms
Full Home WiFi - more than 2 rooms
Fiber to the room - Full villa
In upselling extender there are two main cases either the user is already having an extender (any) or he doesnt have any extender.
There are 3 extender e& provides to the customer. i.e. Home Zone, Full Home Wifi and Fiber to the Room (FTTR)
Home Zone - less than 2 rooms
Full Home WiFi - more than 2 rooms
Fiber to the room - Full villa
In upselling extender there are two main cases either the user is already having an extender (any) or he doesnt have any extender.
User not having any extender


The upselling journey starts right from the address details screens, here we have asked the user abou the number of rooms in his new apartment or villa. This helps us the software decide wheather should we upsell extender or not. Also when we are pitching upselling for extender which extender we should upsell. In this scenarios the user is not having extender and is moving to more number of rooms. We will upsell all extender. User can add the extender and it will be reflected in the order summary page.
Reason for upselling extenders here.
Since the user does not currently have an extender and may be moving into a larger apartment with more rooms, there is a clear need for an extender that we can offer. If the user decides to purchase an extender later during their membership, they would need to pay separate delivery and installation charges. However, by providing the option at this stage, the extender can be installed during the same technician visit, avoiding any additional costs for the user.
User having any extender
For users with an extender, there are mainly two scenarios: either they move to the same number of rooms, or they move to a higher number of rooms. Downgrading from the current extender is not possible.
Case 1: Moving to same number of rooms


During the new location selection phase, the user is asked to choose the number of rooms in their new apartment. If the user is moving to the same number of rooms, we do not offer an upsell since no additional extenders are needed. Instead, they are asked whether they would like to retain their current extender. If the user chooses to cancel the current extender, cancellation charges will apply.
The Home Zone requirements guide the user by clarifying that the existing device does not need to be returned. Additionally, if the user has opted for new devices, these will be installed at the new location.
Case 2: Moving to a greater number of rooms


If the user is moving to a greater number of rooms, we upsell extenders. Over here also we have kept the design consistent. the user will be first asked about whether they would like to keep thier extender or not. They can idher choose to keep the current extender or cancel it same as case 1.
But, since the user is moving to a greater number of rooms they would require more range to use internet. In this case we have home zone, so we will upsell full home WIfi and Fttr. In this case the user can easily click to add on any of the card to add that extender to their order, and it will installed same time with technician visit.
This case leads to multiple possible scenarios:
The user keeps the current extender.
The user cancels the current extender.
The user keeps the current extender and adds another extender.
The user cancels the current extender and upgrades to a new extender.
The guiding UX principle here is to empower user choice rather than impose restrictions. This aligns with the UX philosophy of user autonomy and control (Nielsen’s Usability Heuristic: User Control and Freedom), ensuring that users feel in charge of their decisions rather than being constrained by limited options.
Note: The same scenarios will apply to both Full Home WiFi and Fiber to the Room. However, in the case of Full Home WiFi, the only available upsell option is Fiber to the Room. For Fiber to the Room, no upsell is offered since there is no larger extender available.
Important to know

Old screen
Old screen

New screen
New screen
The "Important to Know" screen is a mandatory step where users must review all key information before placing their final order. The design of this screen has been enhanced for better clarity. Content is now organized into two clear sections:
Mandatory devices to carry to the new location
Devices to leave behind
Since many customers previously left important devices at their old home due to unclear instructions, the design has been simplified. Unnecessary elements were removed, and clear, concise guidance is now provided to ensure customers understand exactly what to do.
Summary

Old screen
Old screen

New Screen
New Screen
In summary screen the information was looking bit scattered and there was no hirarchy. we have tired to created a better version for this as well.
Home move details are provided upfront as it was important information, and below that user can see the order summary where also we have bifercated the information into different sections as Devices, one time charges
In the summary screen, the original information appeared scattered and lacked hierarchy. We redesigned it to create a clearer and more structured version.
Key details of the home move are provided upfront, as they are the most important. Below that, users can view the order summary, which is organized into distinct sections. These sections are dynamic and change based on the selections made throughout the journey:
- Monthly Charges
Includes the cost of any extender purchased during the process.
- Devices
Shows device costs, or indicates "No Extra Charge" if the devices are provided for free.
- Additional Devices
Covers any extra devices purchased during the device redemption journey.
- One-Time Charges
Includes technician visit fees or cancellation charges if the user chooses to cancel their current extenders.


Confirmation

In the initial journey, there was no confirmation screen, which is a crucial step. To provide proper closure for the user, we introduced a confirmation screen that clearly communicates:
- What’s next: the upcoming steps users should expect
- Guidance on the actions they need to take
- An option to track their request in real time
This case study does not cover the order tracking journey. However, if you would like to explore the detailed design process and the extensive work that went into it, here is the Figma link.- https://www.figma.com/design/rm4qkTmYTcEkOc3Qp8qqia/portfolio-cs?node-id=0-1
Metrics Achieved
Shifting request
19%
19%
Drop off
28-30%
28-30%
Successfully achieved 12% monthly reduction in shifting requests.
Here's the detailed user journey
Thank you
The Home Move feature was a special project for me, as I had the opportunity to design it from scratch while leading the UI/UX efforts. What makes it even more remarkable is that it will potentially be used by around 177 million users. We designed an intuitive journey that requires only 4–5 clicks, while also covering scenarios like device redemption and extender upselling without disrupting the flow. Every screen went through multiple iterations on both UI and UX to ensure the best possible experience for users.
Key learning
This project was not just about designing the experience, it was also a tremendous learning opportunity in project management. From discussing designs with the project manager to giving multiple walkthroughs to developers, backend teams, and other stakeholders, I gained valuable experience in managing a project end-to-end, almost single-handedly.
Contact
Let's start creating together
ujjwal.design23@gmail.com
Copied
2026 Ujjwal Kumar Singh I Portfolio I All rights reserved
Contact
Let's start creating together
ujjwal.design23@gmail.com
Copied
2026 Ujjwal Kumar Singh I Portfolio I All rights reserved
Contact
Let's start creating together
ujjwal.design23@gmail.com
Copied
2026 Ujjwal Kumar Singh I Portfolio I All rights reserved
Etisalat
e& (formerly Etisalat) is an Emirati state-owned telecom company, ranked 16th globally by subscribers. It’s a major internet hub and the largest international voice carrier in the Middle East and Africa.
Role
As a UX designer, it was essential for me to understand the business requirements and apply UX best practices to improve the experience for 173 million user across mobile, web, and SaaS platforms. My key achievements include leading the redesign of major features such as Home Move, Usage Summary, and Add-on purchases.
We need to follow the Markaz library—a design system that outlines all components and guidelines to ensure consistency and efficiency across the platform.
Goal
The goal of this case study is to show how I applied core UX principles to solve a common issue faced by user of e& while using the home feature of etisalat while moving form old location to new.
Duration
9 months (Overall project), 3 week (Home move ticket)
Problem statement
Revamp whole Home move feature.
Enhance the overall user experience of the Home Move feature used by 173 millions of customer, identifying user pain points and frustrations. Design a more intuitive and informative journey that clearly communicates each user action, ensuring the process is as simple and straightforward as possible.
Metrics
Note - You can find the Impact Metrics (result) at the end of case study
Shifting request
31%
Drop off
55%
What is Home Move?
Etisalat provides network connectivity to its customers. When a customer plans to move from their old location to a new one, they use the Home Move feature to ensure uninterrupted connectivity and continued access to the e& network. And e& don't lose the loyal customers. However, over time, some issues with this feature have caused customer frustration and drop-offs.
User research and Analysis
Understanding user pain points
Lets draw the current journey.
Redefined Problem Statement
The Home Move journey is complex and confusing, causing user frustration due to unnecessary steps, unclear communication, and limited service options at new locations.
The overall Home Move journey is not intuitive or user-friendly, with many unnecessary steps. In most cases, the move-out date from the old location is the same as the move-in date at the new location. Customers often receive confusing or incorrect information about the technician's contact number. Additionally, if the new location is not yet covered by the e& network, customers are not offered alternative internet service options.
What is to be done
Add the Home Move feature prominently on the landing screen.
Redesign the process for adding a new address to be more intuitive, including scenarios for areas without e& network coverage by providing alternative options like home wireless.
Remove the Move-Out Date as a mandatory step and integrate it as an optional field within the Move-In Date screen.
Introduce a Contact screen with an option to add an alternate contact number.
Include device redemption scenarios as optional steps.
Incorporate upselling opportunities for extenders as optional scenarios.
Add an Important-to-Know screen covering device redemption details.
Update the Order Summary screen for clarity and completeness.
Create a Confirmation screen that includes an order tracking link.
These key UX tasks have been identified to improve the project’s overall user experience and significantly reduce drop-off rates. The current screens use outdated designs, so modern design styles should be incorporated to create a fresh and engaging experience. Special attention must be given to minimizing cognitive load across all screens to reduce user friction as much as possible.
Pain points
The "Home Move" feature is buried too deep within profile management, making it nearly impossible for users to find and start the process.
Users have no visibility into the number of steps required, leading to frustration and "progress fatigue."
The map pin and text address fields are not synchronized, making it unintuitive and difficult to pinpoint a specific location.
In areas without a wired e& network, the app fails to provide alternative connectivity options (like 5G/Wireless), leading to "service dead end".
A lack of clear communication regarding the exact installation time at the new address creates unnecessary anxiety and scheduling conflicts.
The journey treats "Move-Out" and "Move-In" as two separate, mandatory milestones, despite them being identical for 99% of customers.
Relying on only one contact number often results in missed appointments if the user is momentarily unavailable.
User has to pay extra amount for installation of redemption device and extendors after home move is done.
Unclear instructions on which devices to pack and which to leave behind frequently lead to missing hardware and installation delays.
The order summary page lacks a clear visual hierarchy, making it difficult for users to understand the pricing breakdown at a glance.
The absence of an order tracking link at the end of the journey leaves users in the dark regarding their request status.
Home move in landing screen
As per the requirements, the Home Move feature is placed within the Manage Profile section and added to the Quick Access area, providing customers with multiple entry points into the journey. New customers can also find the Home Move feature prominently displayed upfront, eliminating the need to search for it elsewhere in the app.
Onboarding
New Screen
Old screen
The onboarding screen was also uplifted.
For UX -
Provide a warm and reassuring onboarding message: "Let us take care of your plan, so you can focus on settling into your new home!" to ease user anxiety and build trust.
Limit the Home Move journey to three mandatory steps, clearly communicating this to reduce user stress about the process length.
Transparently display all charges related to the Home Move upfront, helping users understand costs from the very beginning and avoid surprises.
For UI -
Maintain a clear and uncluttered user interface to enhance usability and focus.
Apply modern design principles to create a fresh, engaging, and elevated user experience.
Use background imagery that evokes positive emotions and reinforces the happiness associated with moving into a new home.
"The Home Move process is now streamlined into 3 main, easy-to-follow steps, enhancing user clarity and reducing complexity. "
Step 1 - Add new address
For adding new address we have 3 scenarios -
Same Emirates - When the user is moving within same emirates and has e& connection in the new location
Different Emirates - When the user is moving from one emirates to another emirates and has e& connection in the new location
No connection - When the user is moving to a location without e& connection.
Same Emirates
A visual progress bar clearly indicates the user’s advancement through the Home Move tasks, providing continuous feedback and reducing uncertainty.
Map allows users to add a new address by either manually entering the location or searching via suggestions, with an interactive map to pinpoint the exact address for accuracy.
Bottom sheet appears after confirming the location. This involves entering detailed address information where the building name and street area are pre-filled but editable, and the flat or villa number must be entered to specify the exact location.
The option to add the number of rooms in the new home is introduced to tailor the experience, enabling targeted upselling opportunities such as Wi-Fi extenders for larger spaces.
Different Emirates


When a user moves to a different emirate, they are required to change their phone number. The system will automatically generate a new number for them, but they still have the option to customize it if they wish. Since changing the number is part of the "Add New Address" task, it will be considered as part of the first step in the home move process.
No connection
When a user moves to an area without e& network coverage, they are offered three key options: wait for the network to be established in that location within a specific timeframe; use the Home Wireless plan, which works without e& installation; or contact support to discuss the issue directly. This approach addresses major customer concerns like lack of alternative options and waiting without charges. A clear message such as "We're currently expanding our coverage and expect to reach this location within 15 days" informs users about the wait time upfront, reducing uncertainty and easing the decision-making process.
Step 2 - Move in date & time
For selecting move in date & time we have 4 scenarios
Technician slot available - When technician's slot is available for the visit.
Technician slot unavailable - When technician's slot is unavailable for the visit.
Move out date is before move in date - When the user wants to change the move-out date to a date before the move-in date.
Move out date is after move in date - When the user wants to change the move-out date to a date after the move-in date.
Technician slot available
In the ideal scenario, all technician slots are available. The system will automatically preselect the first available slot, since most users prefer choosing the earliest option. This way, in most cases, users only need to confirm the date rather than manually selecting one.
Technician slot unavailable
In some cases, the technician are not available to visit the new location. The system will preselect the first available slot. In most cases the user would want to select the first available slot. The system will also notify with the user with a note "Since there are no slots available on selected move-in date, we are giving you the next available slot."
Move out date is after move in date

By default, the system sets the move-in and move-out dates to be the same unless the user actively changes the move-out date. To do this, users can click on a clearly labeled option, ‘Is your move-out date different?’ and then select ‘Change.’ This interaction leverages the Gestalt principle of closure, helping users intuitively recognize and differentiate the feature. If a move-out date earlier than the move-in date is selected, the system will automatically update it once the change is confirmed.
Move out date is after move in date

If the user selects a move-out date that is before the move-in date, the system will display an error message: "Date conflict: Move-in is 14 Feb, move-out is 16 Feb. Please reschedule." The call-to-action button will automatically update to "Update Move-in Date." The user must then update the move-in date to a date after the move-out date, after which they can confirm and proceed to the third step.
Step 3: Contact preference
For contact preference we have 2 scenarios
Use primary number - When the user prefers to be contacted on the primary they use for all the purpose.
User alternate number - When the user prefers to be contacted on the alternate number solely used for the home move purpose.
Use primary number
In the ideal scenario, most users tend to select their primary phone number as the preferred contact method. The system will prefill this number and clearly display the message, "The technician will call you on this number".
User alternate number
Following the same Gestalt principle, the option to add an alternate contact number is positioned consistently in the same area as the ‘Change move-out date’ option, maintaining design uniformity. If the user wishes to add an alternate number, they can click ‘Add,’ which opens a bottom sheet with a clear message: ‘In case your main number is temporarily unavailable, we’ll try this one instead. Messages will still continue to go to your primary number.’ This message prevents confusion about message routing to the alternate number. Once the user adds and confirms the alternate number, it will be updated on the contact preference screen, and the message ‘The technician will call you on this number’ will shift to the alternate number.
Here are the sub scenarios of device redemption and upselling extenders.
Device Redemption
Device redemption refers to scenarios where a customer has been using an e&-provided device that is either outdated or has exceeded two years of use. In such cases, the customer is offered a replacement device, which could be free or available under the Neo (paid) plan. The key challenge with device redemption is that customers were unclear about their eligibility and, even if they were eligible, they often did not know that separate delivery or installation charges might apply.
Upselling extenders
When customers move from their old location to a new one, they may shift into a larger apartment with more rooms. In such cases, having additional devices becomes essential to ensure stronger internet coverage across the entire home. This creates an opportunity to upsell extenders devices that can be placed in different corners or rooms to expand and enhance the network range.
Device Redemption
Additional devices
Eligible
Paid
Device redemption mainly has 3 scenarios.
If the customer is not eligible for device redemption, this journey will not be visible to them.
If the customer is eligible for a free device redemption, they will see the "Get a New Device" screen with the available free device options. They can also choose to add additional devices for a fee.
Alongside, Neo plan devices will be displayed as paid options.
Whatever devices user adds is reflected in the order summary page.
Upselling extenders
There are 3 extender e& provides to the customer. i.e. Home Zone, Full Home Wifi and Fiber to the Room (FTTR)
Home Zone - less than 2 rooms
Full Home WiFi - more than 2 rooms
Fiber to the room - Full villa
In upselling extender there are two main cases either the user is already having an extender (any) or he doesnt have any extender.
User not having any extender
The upselling journey starts right from the address details screens, here we have asked the user abou the number of rooms in his new apartment or villa. This helps us the software decide wheather should we upsell extender or not. Also when we are pitching upselling for extender which extender we should upsell. In this scenarios the user is not having extender and is moving to more number of rooms. We will upsell all extender. User can add the extender and it will be reflected in the order summary page.
Reason for upselling extenders here.
Since the user does not currently have an extender and may be moving into a larger apartment with more rooms, there is a clear need for an extender that we can offer. If the user decides to purchase an extender later during their membership, they would need to pay separate delivery and installation charges. However, by providing the option at this stage, the extender can be installed during the same technician visit, avoiding any additional costs for the user.
User having any extender
For users with an extender, there are mainly two scenarios: either they move to the same number of rooms, or they move to a higher number of rooms. Downgrading from the current extender is not possible.
Case 1: Moving to same number of rooms
During the new location selection phase, the user is asked to choose the number of rooms in their new apartment. If the user is moving to the same number of rooms, we do not offer an upsell since no additional extenders are needed. Instead, they are asked whether they would like to retain their current extender. If the user chooses to cancel the current extender, cancellation charges will apply.
The Home Zone requirements guide the user by clarifying that the existing device does not need to be returned. Additionally, if the user has opted for new devices, these will be installed at the new location.
Case 2: Moving to a greater number of rooms
If the user is moving to a greater number of rooms, we upsell extenders. Over here also we have kept the design consistent. the user will be first asked about whether they would like to keep thier extender or not. They can idher choose to keep the current extender or cancel it same as case 1.
But, since the user is moving to a greater number of rooms they would require more range to use internet. In this case we have home zone, so we will upsell full home WIfi and Fttr. In this case the user can easily click to add on any of the card to add that extender to their order, and it will installed same time with technician visit.
This case leads to multiple possible scenarios:
The user keeps the current extender.
The user cancels the current extender.
The user keeps the current extender and adds another extender.
The user cancels the current extender and upgrades to a new extender.
The guiding UX principle here is to empower user choice rather than impose restrictions. This aligns with the UX philosophy of user autonomy and control (Nielsen’s Usability Heuristic: User Control and Freedom), ensuring that users feel in charge of their decisions rather than being constrained by limited options.
Note: The same scenarios will apply to both Full Home WiFi and Fiber to the Room. However, in the case of Full Home WiFi, the only available upsell option is Fiber to the Room. For Fiber to the Room, no upsell is offered since there is no larger extender available.
Important to know
Old screen
New screen
The "Important to Know" screen is a mandatory step where users must review all key information before placing their final order. The design of this screen has been enhanced for better clarity. Content is now organized into two clear sections:
Mandatory devices to carry to the new location
Devices to leave behind
Since many customers previously left important devices at their old home due to unclear instructions, the design has been simplified. Unnecessary elements were removed, and clear, concise guidance is now provided to ensure customers understand exactly what to do.
Here are the sub scenarios of device redemption and upselling extenders.
Device Redemption
Device redemption refers to scenarios where a customer has been using an e&-provided device that is either outdated or has exceeded two years of use. In such cases, the customer is offered a replacement device, which could be free or available under the Neo (paid) plan. The key challenge with device redemption is that customers were unclear about their eligibility and, even if they were eligible, they often did not know that separate delivery or installation charges might apply.
Upselling extenders
When customers move from their old location to a new one, they may shift into a larger apartment with more rooms. In such cases, having additional devices becomes essential to ensure stronger internet coverage across the entire home. This creates an opportunity to upsell extenders devices that can be placed in different corners or rooms to expand and enhance the network range.
Summary
Old screen
New Screen
In summary screen the information was looking bit scattered and there was no hirarchy. we have tired to created a better version for this as well.
Home move details are provided upfront as it was important information, and below that user can see the order summary where also we have bifercated the information into different sections as Devices, one time charges
In the summary screen, the original information appeared scattered and lacked hierarchy. We redesigned it to create a clearer and more structured version.
Key details of the home move are provided upfront, as they are the most important. Below that, users can view the order summary, which is organized into distinct sections. These sections are dynamic and change based on the selections made throughout the journey:
- Monthly Charges
Includes the cost of any extender purchased during the process.
- Devices
Shows device costs, or indicates "No Extra Charge" if the devices are provided for free.
- Additional Devices
Covers any extra devices purchased during the device redemption journey.
- One-Time Charges
Includes technician visit fees or cancellation charges if the user chooses to cancel their current extenders.
Confirmation
In the initial journey, there was no confirmation screen, which is a crucial step. To provide proper closure for the user, we introduced a confirmation screen that clearly communicates:
- What’s next: the upcoming steps users should expect
- Guidance on the actions they need to take
- An option to track their request in real time
This case study does not cover the order tracking journey. However, if you would like to explore the detailed design process and the extensive work that went into it, here is the Figma link.- https://www.figma.com/design/rm4qkTmYTcEkOc3Qp8qqia/portfolio-cs?node-id=0-1
Here's the detailed user journey
Metrics Achieved
Shifting request
19%
Drop off
28-30%
Successfully achieved 12% monthly reduction in shifting requests.
Thank you
The Home Move feature was a special project for me, as I had the opportunity to design it from scratch while leading the UI/UX efforts. What makes it even more remarkable is that it will potentially be used by around 177 million users. We designed an intuitive journey that requires only 4–5 clicks, while also covering scenarios like device redemption and extender upselling without disrupting the flow. Every screen went through multiple iterations on both UI and UX to ensure the best possible experience for users.
Key learning
This project was not just about designing the experience, it was also a tremendous learning opportunity in project management. From discussing designs with the project manager to giving multiple walkthroughs to developers, backend teams, and other stakeholders, I gained valuable experience in managing a project end-to-end, almost single-handedly.
Etisalat
e& (formerly Etisalat) is an Emirati state-owned telecom company, ranked 16th globally by subscribers. It’s a major internet hub and the largest international voice carrier in the Middle East and Africa.
Role
As a UX designer, it was essential for me to understand the business requirements and apply UX best practices to improve the experience for 173 million user across mobile, web, and SaaS platforms. My key achievements include leading the redesign of major features such as Home Move, Usage Summary, and Add-on purchases.
We need to follow the Markaz library—a design system that outlines all components and guidelines to ensure consistency and efficiency across the platform.
Goal
The goal of this case study is to show how I applied core UX principles to solve a common issue faced by user of e& while using the home feature of etisalat while moving form old location to new.
Duration
9 months (Overall project), 3 week (Home move ticket)
Problem statement
Revamp whole Home move feature.
Enhance the overall user experience of the Home Move feature used by 173 millions of customer, identifying user pain points and frustrations. Design a more intuitive and informative journey that clearly communicates each user action, ensuring the process is as simple and straightforward as possible.
What is Home Move?
Etisalat provides network connectivity to its customers. When a customer plans to move from their old location to a new one, they use the Home Move feature to ensure uninterrupted connectivity and continued access to the e& network. And e& don't lose the loyal customers. However, over time, some issues with this feature have caused customer frustration and drop-offs.
Understanding user pain points
Lets draw the current journey.
User research and Analysis
Metrics
Shifting request
31%
Drop off
55%
Note - You can find the Impact Metrics (result) at the end of case study
What is to be done
Add the Home Move feature prominently on the landing screen.
Redesign the process for adding a new address to be more intuitive, including scenarios for areas without e& network coverage by providing alternative options like home wireless.
Remove the Move-Out Date as a mandatory step and integrate it as an optional field within the Move-In Date screen.
Introduce a Contact screen with an option to add an alternate contact number.
Include device redemption scenarios as optional steps.
Incorporate upselling opportunities for extenders as optional scenarios.
Add an Important-to-Know screen covering device redemption details.
Update the Order Summary screen for clarity and completeness.
Create a Confirmation screen that includes an order tracking link.
These key UX tasks have been identified to improve the project’s overall user experience and significantly reduce drop-off rates. The current screens use outdated designs, so modern design styles should be incorporated to create a fresh and engaging experience. Special attention must be given to minimizing cognitive load across all screens to reduce user friction as much as possible.
Pain points
The "Home Move" feature is buried too deep within profile management, making it nearly impossible for users to find and start the process.
Users have no visibility into the number of steps required, leading to frustration and "progress fatigue."
The map pin and text address fields are not synchronized, making it unintuitive and difficult to pinpoint a specific location.
In areas without a wired e& network, the app fails to provide alternative connectivity options (like 5G/Wireless), leading to "service dead end".
A lack of clear communication regarding the exact installation time at the new address creates unnecessary anxiety and scheduling conflicts.
The journey treats "Move-Out" and "Move-In" as two separate, mandatory milestones, despite them being identical for 99% of customers.
Relying on only one contact number often results in missed appointments if the user is momentarily unavailable.
User has to pay extra amount for installation of redemption device and extendors after home move is done.
Unclear instructions on which devices to pack and which to leave behind frequently lead to missing hardware and installation delays.
The order summary page lacks a clear visual hierarchy, making it difficult for users to understand the pricing breakdown at a glance.
The absence of an order tracking link at the end of the journey leaves users in the dark regarding their request status.
Redefined Problem Statement
The Home Move journey is complex and confusing, causing user frustration due to unnecessary steps, unclear communication, and limited service options at new locations.
The overall Home Move journey is not intuitive or user-friendly, with many unnecessary steps. In most cases, the move-out date from the old location is the same as the move-in date at the new location. Customers often receive confusing or incorrect information about the technician's contact number. Additionally, if the new location is not yet covered by the e& network, customers are not offered alternative internet service options.
Home move in landing screen
As per the requirements, the Home Move feature is placed within the Manage Profile section and added to the Quick Access area, providing customers with multiple entry points into the journey. New customers can also find the Home Move feature prominently displayed upfront, eliminating the need to search for it elsewhere in the app.
Device Redemption
Additional devices
Eligible
Paid
Device redemption mainly has 3 scenarios.
If the customer is not eligible for device redemption, this journey will not be visible to them.
If the customer is eligible for a free device redemption, they will see the "Get a New Device" screen with the available free device options. They can also choose to add additional devices for a fee.
Alongside, Neo plan devices will be displayed as paid options.
Whatever devices user adds is reflected in the order summary page.
Onboarding
New Screen
Old screen
The onboarding screen was also uplifted.
For UX -
Provide a warm and reassuring onboarding message: "Let us take care of your plan, so you can focus on settling into your new home!" to ease user anxiety and build trust.
Limit the Home Move journey to three mandatory steps, clearly communicating this to reduce user stress about the process length.
Transparently display all charges related to the Home Move upfront, helping users understand costs from the very beginning and avoid surprises.
For UI -
Maintain a clear and uncluttered user interface to enhance usability and focus.
Apply modern design principles to create a fresh, engaging, and elevated user experience.
Use background imagery that evokes positive emotions and reinforces the happiness associated with moving into a new home.
Device Redemption
Device redemption refers to scenarios where a customer has been using an e&-provided device that is either outdated or has exceeded two years of use. In such cases, the customer is offered a replacement device, which could be free or available under the Neo (paid) plan. The key challenge with device redemption is that customers were unclear about their eligibility and, even if they were eligible, they often did not know that separate delivery or installation charges might apply.
Here are the sub scenarios of device redemption and upselling extenders.
Upselling extenders
When customers move from their old location to a new one, they may shift into a larger apartment with more rooms. In such cases, having additional devices becomes essential to ensure stronger internet coverage across the entire home. This creates an opportunity to upsell extenders devices that can be placed in different corners or rooms to expand and enhance the network range.
Same Emirates
A visual progress bar clearly indicates the user’s advancement through the Home Move tasks, providing continuous feedback and reducing uncertainty.
Map allows users to add a new address by either manually entering the location or searching via suggestions, with an interactive map to pinpoint the exact address for accuracy.
Bottom sheet appears after confirming the location. This involves entering detailed address information where the building name and street area are pre-filled but editable, and the flat or villa number must be entered to specify the exact location.
The option to add the number of rooms in the new home is introduced to tailor the experience, enabling targeted upselling opportunities such as Wi-Fi extenders for larger spaces.
Different Emirates
When a user moves to a different emirate, they are required to change their phone number. The system will automatically generate a new number for them, but they still have the option to customize it if they wish. Since changing the number is part of the "Add New Address" task, it will be considered as part of the first step in the home move process.
No connection
When a user moves to an area without e& network coverage, they are offered three key options: wait for the network to be established in that location within a specific timeframe; use the Home Wireless plan, which works without e& installation; or contact support to discuss the issue directly. This approach addresses major customer concerns like lack of alternative options and waiting without charges. A clear message such as "We're currently expanding our coverage and expect to reach this location within 15 days" informs users about the wait time upfront, reducing uncertainty and easing the decision-making process.
Step 2 - Move in date & time
For selecting move in date & time we have 4 scenarios
Technician slot available - When technician's slot is available for the visit.
Technician slot unavailable - When technician's slot is unavailable for the visit.
Move out date is before move in date - When the user wants to change the move-out date to a date before the move-in date.
Move out date is after move in date - When the user wants to change the move-out date to a date after the move-in date.
Technician slot available
In the ideal scenario, all technician slots are available. The system will automatically preselect the first available slot, since most users prefer choosing the earliest option. This way, in most cases, users only need to confirm the date rather than manually selecting one.
Technician slot unavailable
In some cases, the technician are not available to visit the new location. The system will preselect the first available slot. In most cases the user would want to select the first available slot. The system will also notify with the user with a note "Since there are no slots available on selected move-in date, we are giving you the next available slot."
Move out date is after move in date
By default, the system sets the move-in and move-out dates to be the same unless the user actively changes the move-out date. To do this, users can click on a clearly labeled option, ‘Is your move-out date different?’ and then select ‘Change.’ This interaction leverages the Gestalt principle of closure, helping users intuitively recognize and differentiate the feature. If a move-out date earlier than the move-in date is selected, the system will automatically update it once the change is confirmed.
Move out date is after move in date
If the user selects a move-out date that is before the move-in date, the system will display an error message: "Date conflict: Move-in is 14 Feb, move-out is 16 Feb. Please reschedule." The call-to-action button will automatically update to "Update Move-in Date." The user must then update the move-in date to a date after the move-out date, after which they can confirm and proceed to the third step.
Step 3: Contact preference
For contact preference we have 2 scenarios
Use primary number - When the user prefers to be contacted on the primary they use for all the purpose.
User alternate number - When the user prefers to be contacted on the alternate number solely used for the home move purpose.
Use primary number
In the ideal scenario, most users tend to select their primary phone number as the preferred contact method. The system will prefill this number and clearly display the message, "The technician will call you on this number".
User alternate number
Following the same Gestalt principle, the option to add an alternate contact number is positioned consistently in the same area as the ‘Change move-out date’ option, maintaining design uniformity. If the user wishes to add an alternate number, they can click ‘Add,’ which opens a bottom sheet with a clear message: ‘In case your main number is temporarily unavailable, we’ll try this one instead. Messages will still continue to go to your primary number.’ This message prevents confusion about message routing to the alternate number. Once the user adds and confirms the alternate number, it will be updated on the contact preference screen, and the message ‘The technician will call you on this number’ will shift to the alternate number.
Device Redemption
Device redemption refers to scenarios where a customer has been using an e&-provided device that is either outdated or has exceeded two years of use. In such cases, the customer is offered a replacement device, which could be free or available under the Neo (paid) plan. The key challenge with device redemption is that customers were unclear about their eligibility and, even if they were eligible, they often did not know that separate delivery or installation charges might apply.
Here are the sub scenarios of device redemption and upselling extenders.
Upselling extenders
When customers move from their old location to a new one, they may shift into a larger apartment with more rooms. In such cases, having additional devices becomes essential to ensure stronger internet coverage across the entire home. This creates an opportunity to upsell extenders devices that can be placed in different corners or rooms to expand and enhance the network range.
Important to know
Old screen
New screen
The "Important to Know" screen is a mandatory step where users must review all key information before placing their final order. The design of this screen has been enhanced for better clarity. Content is now organized into two clear sections:
Mandatory devices to carry to the new location
Devices to leave behind
Since many customers previously left important devices at their old home due to unclear instructions, the design has been simplified. Unnecessary elements were removed, and clear, concise guidance is now provided to ensure customers understand exactly what to do.
Step 1 - Add new address
For adding new address we have 3 scenarios -
Same Emirates - When the user is moving within same emirates and has e& connection in the new location
Different Emirates - When the user is moving from one emirates to another emirates and has e& connection in the new location
No connection - When the user is moving to a location without e& connection.
"The Home Move process is now streamlined into 3 main, easy-to-follow steps, enhancing user clarity and reducing complexity. "
Upselling extenders
For users with an extender, there are mainly two scenarios: either they move to the same number of rooms, or they move to a higher number of rooms. Downgrading from the current extender is not possible.
User having any extender
If the user is moving to a greater number of rooms, we upsell extenders. Over here also we have kept the design consistent. the user will be first asked about whether they would like to keep thier extender or not. They can idher choose to keep the current extender or cancel it same as case 1.
But, since the user is moving to a greater number of rooms they would require more range to use internet. In this case we have home zone, so we will upsell full home WIfi and Fttr. In this case the user can easily click to add on any of the card to add that extender to their order, and it will installed same time with technician visit.
Case 2: Moving to a greater number of rooms
This case leads to multiple possible scenarios:
The user keeps the current extender.
The user cancels the current extender.
The user keeps the current extender and adds another extender.
The user cancels the current extender and upgrades to a new extender.
The guiding UX principle here is to empower user choice rather than impose restrictions. This aligns with the UX philosophy of user autonomy and control (Nielsen’s Usability Heuristic: User Control and Freedom), ensuring that users feel in charge of their decisions rather than being constrained by limited options.
Note: The same scenarios will apply to both Full Home WiFi and Fiber to the Room. However, in the case of Full Home WiFi, the only available upsell option is Fiber to the Room. For Fiber to the Room, no upsell is offered since there is no larger extender available.
During the new location selection phase, the user is asked to choose the number of rooms in their new apartment. If the user is moving to the same number of rooms, we do not offer an upsell since no additional extenders are needed. Instead, they are asked whether they would like to retain their current extender. If the user chooses to cancel the current extender, cancellation charges will apply.
The Home Zone requirements guide the user by clarifying that the existing device does not need to be returned. Additionally, if the user has opted for new devices, these will be installed at the new location.
Case 1: Moving to same number of rooms
There are 3 extender e& provides to the customer. i.e. Home Zone, Full Home Wifi and Fiber to the Room (FTTR)
Home Zone - less than 2 rooms
Full Home WiFi - more than 2 rooms
Fiber to the room - Full villa
In upselling extender there are two main cases either the user is already having an extender (any) or he doesnt have any extender.
User not having any extender
The upselling journey starts right from the address details screens, here we have asked the user abou the number of rooms in his new apartment or villa. This helps us the software decide wheather should we upsell extender or not. Also when we are pitching upselling for extender which extender we should upsell. In this scenarios the user is not having extender and is moving to more number of rooms. We will upsell all extender. User can add the extender and it will be reflected in the order summary page.
Since the user does not currently have an extender and may be moving into a larger apartment with more rooms, there is a clear need for an extender that we can offer. If the user decides to purchase an extender later during their membership, they would need to pay separate delivery and installation charges. However, by providing the option at this stage, the extender can be installed during the same technician visit, avoiding any additional costs for the user.
Reason for upselling extenders here.
Summary
In the summary screen, the original information appeared scattered and lacked hierarchy. We redesigned it to create a clearer and more structured version.
Key details of the home move are provided upfront, as they are the most important. Below that, users can view the order summary, which is organized into distinct sections. These sections are dynamic and change based on the selections made throughout the journey:
- Monthly Charges
Includes the cost of any extender purchased during the process.
- Devices
Shows device costs, or indicates "No Extra Charge" if the devices are provided for free.
- Additional Devices
Covers any extra devices purchased during the device redemption journey.
- One-Time Charges
Includes technician visit fees or cancellation charges if the user chooses to cancel their current extenders.
Confirmation
In the initial journey, there was no confirmation screen, which is a crucial step. To provide proper closure for the user, we introduced a confirmation screen that clearly communicates:
- What’s next: the upcoming steps users should expect
- Guidance on the actions they need to take
- An option to track their request in real time
This case study does not cover the order tracking journey. However, if you would like to explore the detailed design process and the extensive work that went into it, here is the Figma link.- https://www.figma.com/design/rm4qkTmYTcEkOc3Qp8qqia/portfolio-cs?node-id=0-1